Identifying secondary & tertiary objects
Last updated on 2026-03-31 | Edit this page
Estimated time: 25 minutes
Overview
Questions
- How can we detect whole cells once we have identified nuclei?
- What is the differences between detecting primary, secondary, and tertiary objects?
Objectives
- Use IdentifySecondaryObjects to segment whole cells from an actin image.
- Understand how secondary objects depend on primary objects.
- Learn how propagation-based segmentation expands from nuclei to cell edges.
- Create a cell object set suitable for per-cell measurements.
- Use IdentifyTertiaryObjects to create cytoplasm masks.
From nuclei to whole cells
In the previous section, we identified nuclei as primary objects. This gives us “seed” objects: one nucleus per cell.
However, many biologically interesting measurements (e.g. cell area, shape and cytoplasmic fluorescence) require us to segment the whole cell. This is often more challenging than nuclei segmentation because:
- cytoplasm and boundaries can be fainter than nuclei,
- neighboring cells may touch or overlap,
- staining can be uneven across the cell body.
To tackle this, CellProfiler provides
IdentifySecondaryObjects, which grows secondary objects
outward from nuclei using information from another image (here an actin
channel). This approach helps prevent ambiguous assignments of boundary
pixels by ensuring each cell is linked to exactly one starting
nucleus.
The IdentifySecondaryObjects module
Add a new module via + Add → Object Processing → IdentifySecondaryObjects.
You should now see a module where you need to specify:
- which primary objects act as “seeds” (nuclei),
- which image contains cell boundary information (actin),
- how to determine where each cell ends (thresholding + method),
- how to handle cells touching the image border.
Step 1: choose primary input objects
Set Select the input objects (or similarly named
setting) to Nuclei or the name you set in the previous
lesson. This tells CellProfiler that each cell object should be grown
outward from one nucleus.
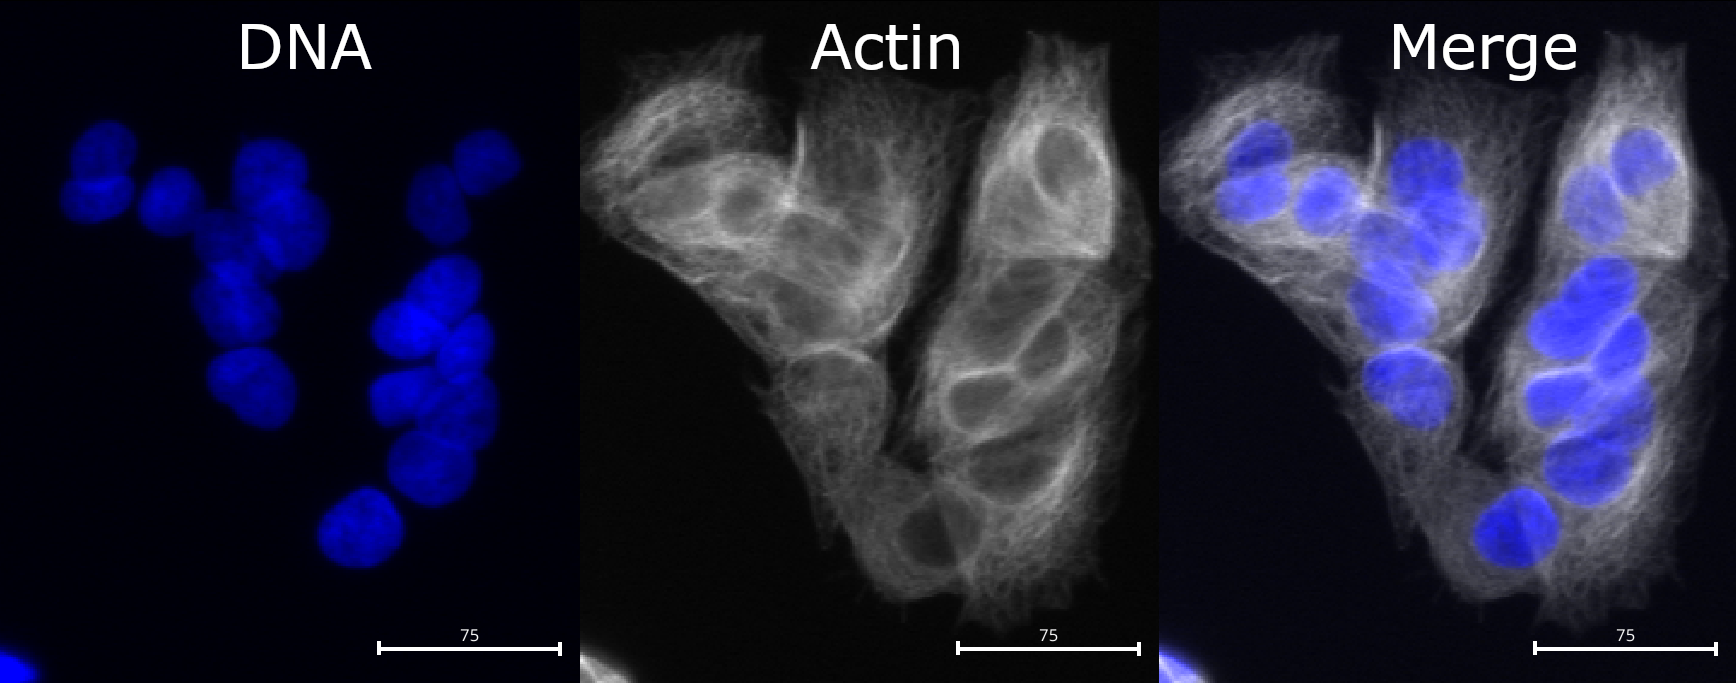
Step 2: choose the correct input image (actin)
Set Select the input image to your actin (or
cytoplasmic) channel, e.g. Actin (or whatever name you
assigned in NamesAndTypes).
The channel should contain relatively strong signal across the cell body and/or along the cell boundary.
Checking the actin image
Using Test Mode, inspect a few images:
- Can you see whole cell bodies?
- Are neighboring cells separable?
- Is the background reasonably dark?
If not, what issues do you observe?
If you find the contrast too dim to see the channel well, you can
increase the contrast. You can do so either by right clicking >
Adjust Contrast, or by selecting
Subplots > (Object name) outlines > Adjust Contrast.
Then, select Log normalized and a
normalization factor that you deem suitable, the click
Apply to all. 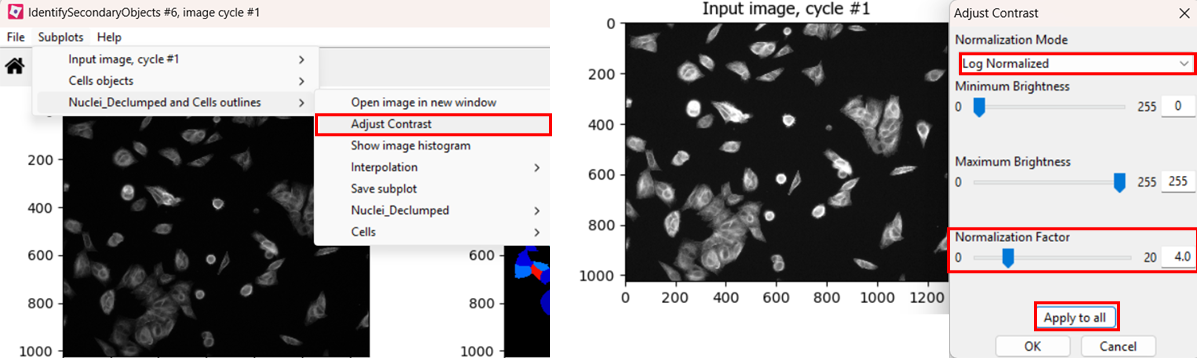
Compared to nuclei, cell boundaries are often less easily
distinguished. We can see that the actin channel does increase at cell
junctions, which should help in segmenting the cells in later steps. But
it is important to keep in mind that any segmentation will not be
perfect here: after all, where would you draw the boundaries by hand?
Step 3: choose a method to identify secondary objects
Now we will use IdentifySecondaryObjects to segment
cells. Many of the options are the same as in
IdentifyPrimaryObjects, but the most important difference
is the presence of
Select the method to identify the secondary objects option.
We encourage you to read their descriptions in CellProfiler by clicking
the ? symbol, but most often it is set to
Propagation. To see why, let’s see what happens when we try
segmenting cells with either method!
Optional challenge: explore methods
Try two different methods (e.g. propagation vs watershed gradient). How do the resulting cell boundaries differ?
As with the segmentation of nuclei, getting cell segmentation right
can be tricky. Often, starting with propagation as method
is a good starting point, because watershed can expand into neighboring
cells (see below). But you can certainly find areas of the image where
the reverse is true. This means that, once again, choices should be made
carefully. 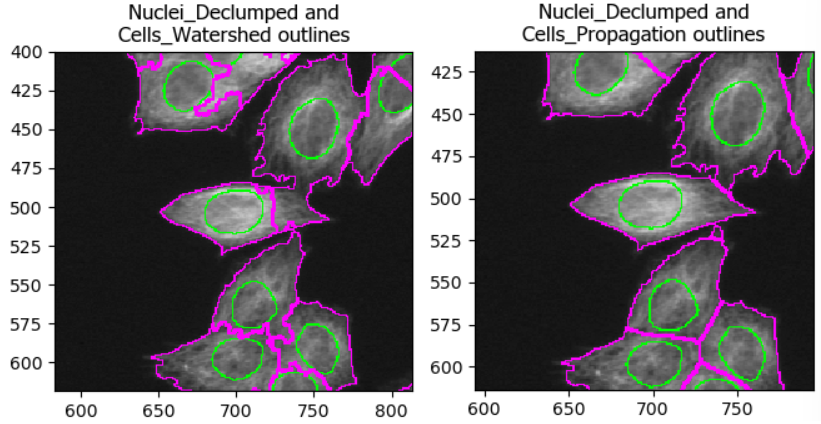
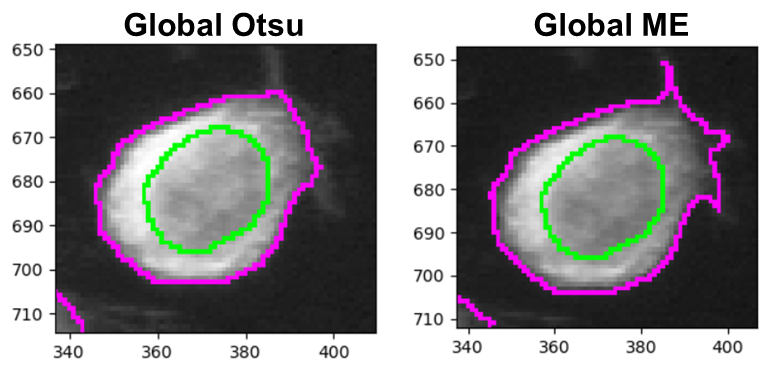
Step 4: choose a threshold strategy and threshold method
Much like when segmenting nuclei, the
IdentifySecondaryObjects module allows us to fine-tune our
segmentation by changing the thresholding strategy and method. As
before, the best choice depends on illumination and staining
consistency. While Minimum Cross-Entropy (right) is the
default thresholding method, Otsu (left) can often also
yield good masks and makes a bit fewer assumptions about your image. For
this dataset they perform very similarly, except that Minimum
Cross-Entropy does slightly better at detecting protrusions such as in
the below image.
Challenge: biological pitfalls
Think about the assumptions CellProfiler is making in its identification of secondary objects. Can you think of biological samples where these assumptions may not be met? Discuss with your neighbor.
CellProfiler identifies cells by expanding outwards from a nucleus. This assumes that each cell only has exactly one nucleus in the same plane. When imaging hepatocytes, for example, this can prove problematic: they often contain more than one nucleus. Equally, if we were imaging cells in suspension, we would have to make sure than we capture the nucleus accurately in 3D and expand the cell in 3D space too. And lastly, red blood cells do not even have a nucleus, so this method would not work for them either!
Other pitfalls include mitotic/meiotic cells: from when on do we term a splitting cell as two cells? When the two nuclei have budded off, or when the membrane is fully split? CellProfiler cannot answer these questions for us, instead, we must consider these biological complexities when designing our analysis pipeline to not yield nonsensical data down the line.
Once you are happy with the result, make sure to check the following options:
- Fill holes in identified objects: Yes
- Discard secondary objects touching the border of the image: Yes
- Discard the associated primary objects: Yes
And finally, name the new primary objects thus filtered,
e.g. Nuclei_Filtered.
Identifying cytoplasm
You have now created whole-cell objects from nuclei seeds and an actin image. Well done! 🎉
With nuclei and cells in hand, we can create one last object: the cytoplasm. Fortunately, this one is easy:
Cytoplasm = Cell - Nucleus
To do this, add the IdentifyTertiaryObjects module and
select what you think are the correct options.
- Larger objects: cells identified with
IdentifySecondaryObjects - Smaller objects: nuclei filtered in
IdentifySecondaryObjects - Name: e.g.
Cytoplasm - Shrink smaller object prior to subtraction:
Yes(default)
Conclusions
Finally, we have created all masks we need and can move on to measure things!
Help
Did you get stuck with one of the steps? Download a working version of the pipeline here:
If you are using Firefox, you have to right click the button and
select Save Link As....
After downloading the pipeline, you can compare it to yours for
troubleshooting. To do so, first open a new CellProfiler window. Then,
import this pipeline in CellProfiler by clicking on File
> Import > Pipeline from File.
- Secondary objects (cells) are typically grown from primary objects (nuclei) using a cytoplasmic/cell-boundary stain (here: actin).
- Filtering border-touching nuclei helps avoid partial cells and misleading measurements.
- The most important settings in IdentifySecondaryObjects are the identification method and thresholding choices, which strongly affect whether cells merge or fragment.
- Tertiary objects (cytoplasm) are a subtraction of nuclei from the cell mask.